Showing posts with label DIY. Show all posts

Tuesday, 12 April 2016

DIY Healthy Hair Mask

I am a lover of Pinterest and I'm one of those people who could sit there on it for hours, i just think it has everything! Last night I was having a little search on it and I came across a very popular DIY hair mask, it sounded simple and loads of people had saved it; so I had to give it a try.
The mask consists of 3 ingredients: Raw Coconut oil, 1 Egg, and Olive oil. I am aware there are many of you who are thinking who the hell would want an egg in your hair.. but believe me it's so nourishing and gives great results.
The egg is great for adding extra protein to your hair, this helps to strengthen it and helps with growth! The Coconut and Olive oil both help to give your hair a nice healthy shine and make it extra soft! I left it on for an hour whilst revising and then washed my hair as normal.
Despite the awful lighting and the fact I'm still in my uniform (blame it on revision) you can see how healthy and shiny my hair looks, this simple DIY hair mask has completely rejuvenated and pampered my hair!

The best thing to apply the mask with is a glazing brush as the hair mask has quite a runny consistency and I found it so much easier to apply with this brush!


Monday, 21 March 2016

Easy Easter hamper and a catch up!

Yet again i have been abusing my blog as i only posted once last week, and just like before I'm going to blame it on revision- lots of it! Although most of my time is consisting of revising i have managed to fit in a few more leisurely things, as an Easter tradition Chad's family all make Easter hampers and put them into a raffle, the idea being that everyone ends up with someone else's hamper. So this year I've had the chance to make my own hamper and quite frankly I've really enjoyed doing something crafty and not revision related! I have finished my hamper all except putting the cellophane and bow on top!

I was lucky enough to find a hamper basket that came with cellophane and a big pink bow from The works. I think this set would be perfect for putting together gifts for any occasions!

I haven't really got a set theme for my hamper, however i think it is very girly and i might have accidentally filled it with my favourite things..

I wanted to make it a little more personal so i decided to make a simple, cute Easter DIY. I just got a little mason jar lined it with pink tissue paper, i drew 3 little Easter eggs on it too. I then filled the jar with a pack of Smarties eggs and placed some kitchen roll over the top before tying twine around the top. I think this looks really sweet!

I also added a Toblerone and a little chocolate plaque with 'Happy Easter' iced onto it!

Finally i added some Jelly beans from my all time favourite, the Jelly bean factory and i picked out a really cute Easter egg from Chockablock, i was so tempted to eat this. Honestly.

I picked up the little pastel polystyrene eggs from Boyes in Lincoln, i think they add a nice , girly final touch to the hamper.

Another reason why i haven't been posting as frequently is because I've recently got a job in a hair and beauty salon, One hair and Beauty. I am really enjoying it so far; I'm learning so much and it really is a lovely, professional, relaxing salon if you are looking for somewhere to get your hair cut, they do prom hair too!

I am really looking forward to the Easter holidays, i am going away with my dad, and i finally get to go to Brighton, Yay! I will definitely be blogging my visit and taking lots of photography.

I hope you're having a good week so far:)


Monday, 21 December 2015

Simple Pot Pourri Tea light holders!

I know I've been obsessed with jars, twine and tea lights recently, but when i was shopping in town today, i came across some strawberry scented Pot Pourri in Pound land and i thought it would look nice in some old jars with some other bits, so i had to pick it up!

You will need:

-Old Jars any shape or size, you don't need the lids

- Pot Pourri of your choice, i of course got pink and it has the scent of Strawberry flower and Lily which i love.


-Tea lights, i got a bag of 40 from Pound Land, unscented as i didn't want them to clash with the Pot Pourri.


- Twine, this adds the traditional, seasonal look that i love.


- Nuts in shells, i thought I'd add a couple to each jar to make them more festive.


The rest is simple, fill your jar with the Pot Pourri, add a few Nuts, place your tea light on top and tie a twine bow round the rim of the jar. Simple!


I hope you enjoy this simple DIY, that's all for today- Lauryn x


Tuesday, 15 December 2015

DIY Christmas candle holder!

After a stressful day of receiving mock results i felt like winding down by doing some Christmassy DIY, me my mum and my brother popped into Dunelm Mill for various other things and i came across this vintage style preserving/ mason jar, for only £3 i had to get it.


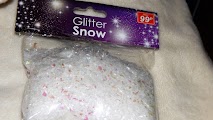
I also picked up some Snow Glitter from What's in store for 99p


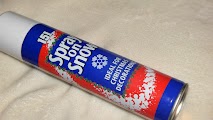
And some Snow Spray from my dads house, but i believe you can get it from places such as hard ware stores.


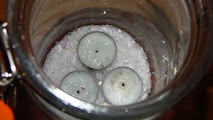
Firstly i poured in some snow glitter into the bottom of the jar, creating a snow like base for the tea lights to sit on.


I then sprayed the outside of the mason jar with the snow spray, not holding it too close, creating a dusted snow effect.


To finish i tied a twine bow around the brim of the jar, this added to the traditional, vintage look of it.


I hope you enjoy this simple, festive DIY and are as excited for Christmas as i am!

That's all for today

Lauryn x


Monday, 23 November 2015

Simple Christmas DIYS!

At the weekend mum told me about some pine cones that were "all over the ground, just down the road, and they seem to good to leave there" this triggered me to think about what i could use them for, and i suddenly got an image of them hanging above the fire, with some silver glitter on of course! So me and mum went to Asdas and Tesco's to get some Christmassy DIY craft stuff. I have 2 Christmas DIY'S to share today.


- Hanging Christmas Pinecones

For this DIY you will need:

  • Pinecones- about 6


  • Twine- you can get this from Asdas in the Christmas section.


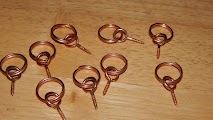
  • Picture hooks- you can probably get these from hardware places i got mine from the picture framing place down my road!


  • Glitter and Glue


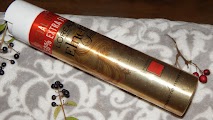
I found Hairspray an easier option, the glitter stuck better with it!


  • Berries/Holly (optional)


Instructions:

1. wash and dry all your pinecones, before either applying PVA glue or spraying hair spray (i found hairspray works better)  and sprinkling each pine cone with glitter, Hairspray also adds a more varnished effect to the Pinecone.


2. Once you have let the pinecones dry screw a picture hook into the top if each pinecone


3. Then thread the hook through the twine tying a knot securing it where you want on the bunting, do this for all the pinecones.
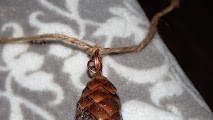


4. If you want extra decoration, tie little bunches of berries in-between each pinecone


I loved the outcome of this simple yet festive DIY, i couldn't not share it with you, I've hung it above the fire and it adds a homely, festive look to the lounge!


This looks so much better and more glittery in real life, but you get the idea!


Festive Snowmen!


You will need:
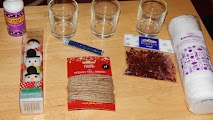


Little Jars or Votive candle holders- you can find these in Tesco's for 50p each!


  • Mini Snow men or any Christmas character- I also found these in Tesco's!


  • Twine


  • Cotton wool


  • Glitter- any colour you want


  • sequins or confetti


  • Glue


What to do:

For the first glass- line the glass with a cotton wool circle,placing the snow man on top, then sprinkle some glitter into the glass and finally tie a bow around the glass using twine- this is so easy yet festive and cute!


For the second glass- Place the snowman inside and decorate the outside with sequins or confetti, i used rose gold hearts that i picked up in Tesco's!
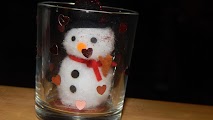


For the third and final one- Place the snowman in the jar, covering it with glitter again and to finish add some holly and a small bunch of winter berries!


These are so simple and self explanatory however i thought i would share this DIY that i came up with so that you can add a simple but festive touch to your home whilst enjoying a nice DIY.


That's all for today, i really enjoyed creating and making these DIY'S and i hope you liked them!


Lauryn x


Saturday, 31 October 2015

Pumpkin and cinnamon squares!

I know it's a tad late as halloweens more or less been and gone, however I used this recipe tonight and I had to share it!

Firstly we need pumpkin so I scooped out the insides of the pumpkin and whilst I did that I couldn't resist to carve a face in the pumpkin! 


I then got all my other ingredients ready, weighing them out accordingly, for this recipe you will need:

4 eggs, beaten
15 ounces of pumpkin, or an alternative fruit such as oranges
1 1/3 cups of sugar 
1 cup of vegetable oil 
2 cups of flour/ gluten free flower in my case 
2 teaspoons of baking powder 
1 teaspoon of baking soda 
2 teaspoons of cinnamon 
1/2 teaspoon of nutmeg/ ginger 
1 teaspoon of salt

For the cream cheese icing:
300g of icing sugar 
50g of unsalted butter 
125g cream cheese 

To start with i blitzed the pumpkin in the nutribullet creating a purée suitable for the cake mixture.


Then I preheated the oven to 200 degrees, find a tin and put it aside.

After I beat the eggs with the pumpkin, sugar and oil until it was well blended.


To follow I sived and added the flour, baking powder, baking soda, salt, cinnamon and nutmeg into a bowl.


I then added these two mixtures together and poured it into a brownie tin, placing it in the oven for roughly 30 minutes, or until you can stab it with a fork without mixture coming out on it. 


After it was ready I left it to cool on a cooling rack for 5-10 minutes. Before icing it with the previously made cream cheese icing. 


These were appreciated by everyone  in my house and I personally liked them! Although I made these for Halloween I would definitely make them again and I recommend the recipe! 


I hope everyone has had a nice Halloween and also half term.


That's all for today, Lauryn x